The documentation set for this product strives to use bias-free language. For the purposes of this documentation set, bias-free is defined as language that does not imply discrimination based on age, disability, gender, racial identity, ethnic identity, sexual orientation, socioeconomic status, and intersectionality. Exceptions may be present in the documentation due to language that is hardcoded in the user interfaces of the product software, language used based on RFP documentation, or language that is used by a referenced third-party product. Learn more about how Cisco is using Inclusive Language.
The Cisco Network Plug and Play solution provides a simple, secure, unified, and integrated offering for enterprise network customers to ease new branch or campus rollouts, or for provisioning updates to an existing network. The solution allows use of Cloud Redirection service, on-prem, or combination which provide a unified approach to provision enterprise networks comprised of Cisco routers, switches, and wireless devices with a near zero touch deployment experience.
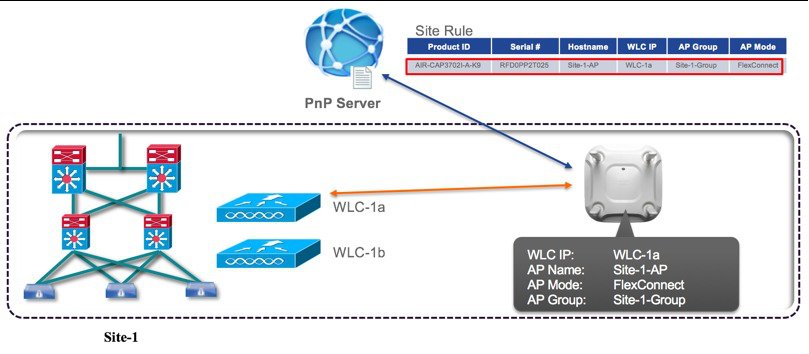
This deployment guide introduces the Cisco Network Plug and Play application for wireless access points. This application allows you to pre-provision the remote site. When you provision a large site, you can use the Cisco Network Plug and Play application to pre-provision the site and add access points to the site. This includes entering access point information and setting up a bootstrap configuration if required. The bootstrap configuration enables the Plug and Play Agent to configure the access point such as the WLC info, hostname, AP group, FlexGroup, AP mode and so on.
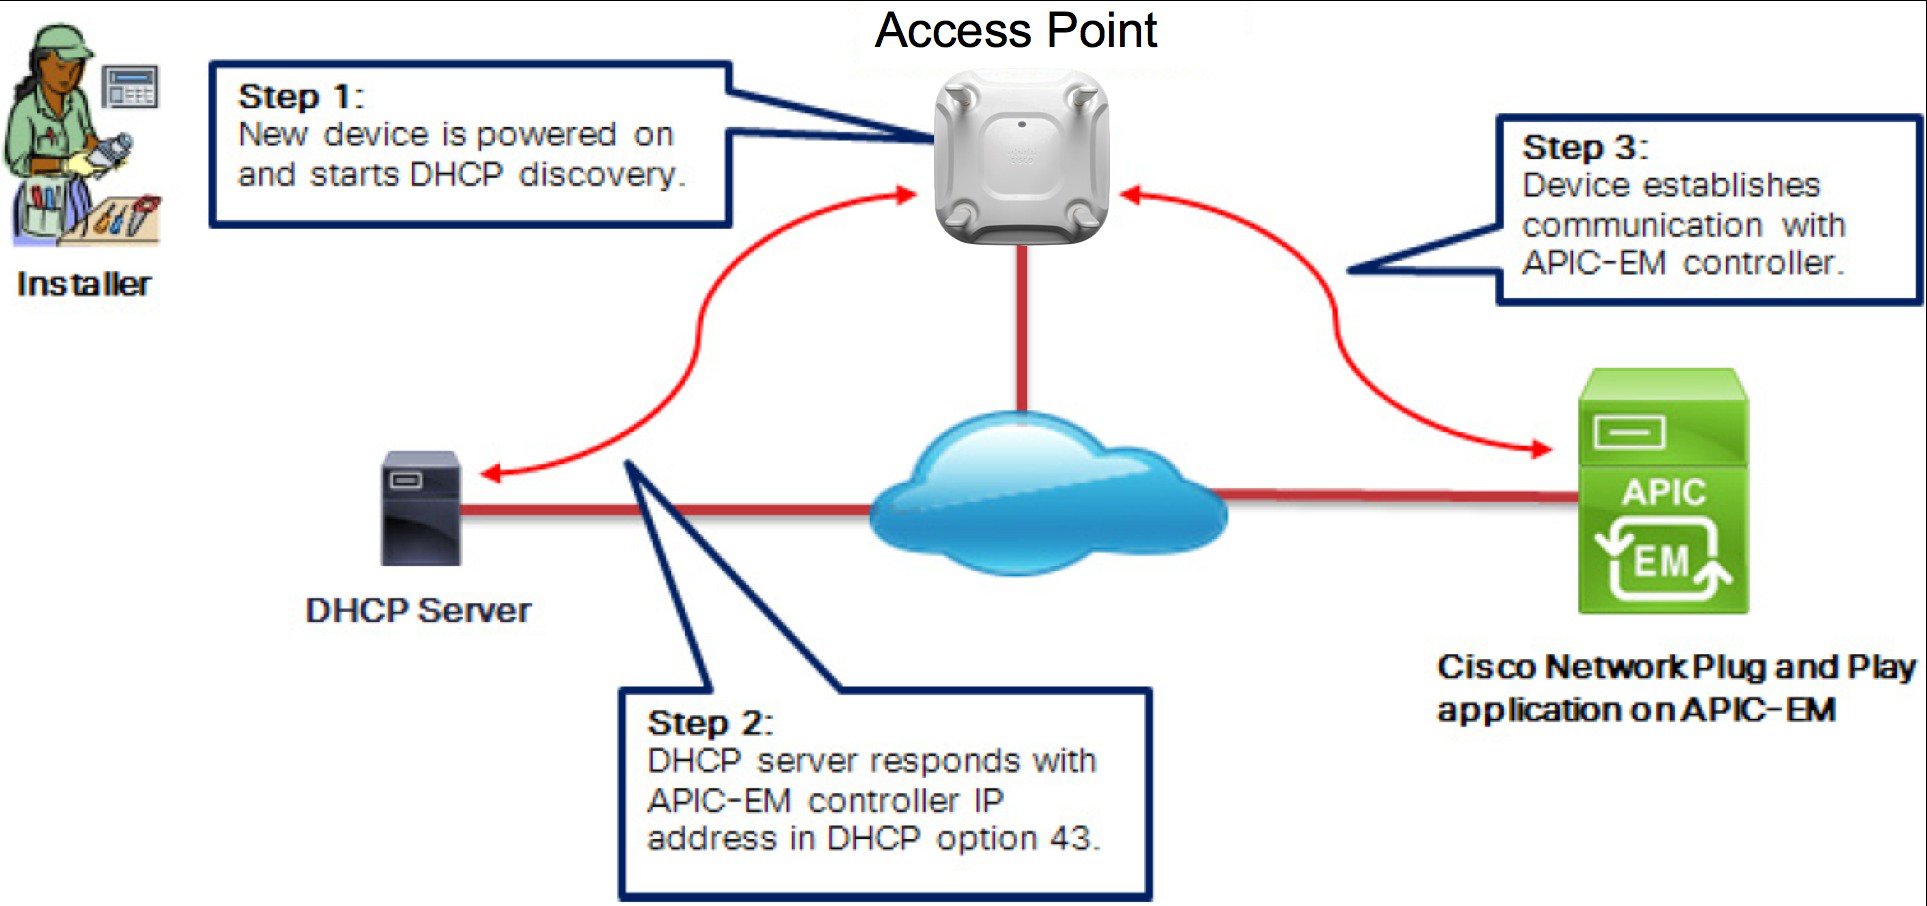
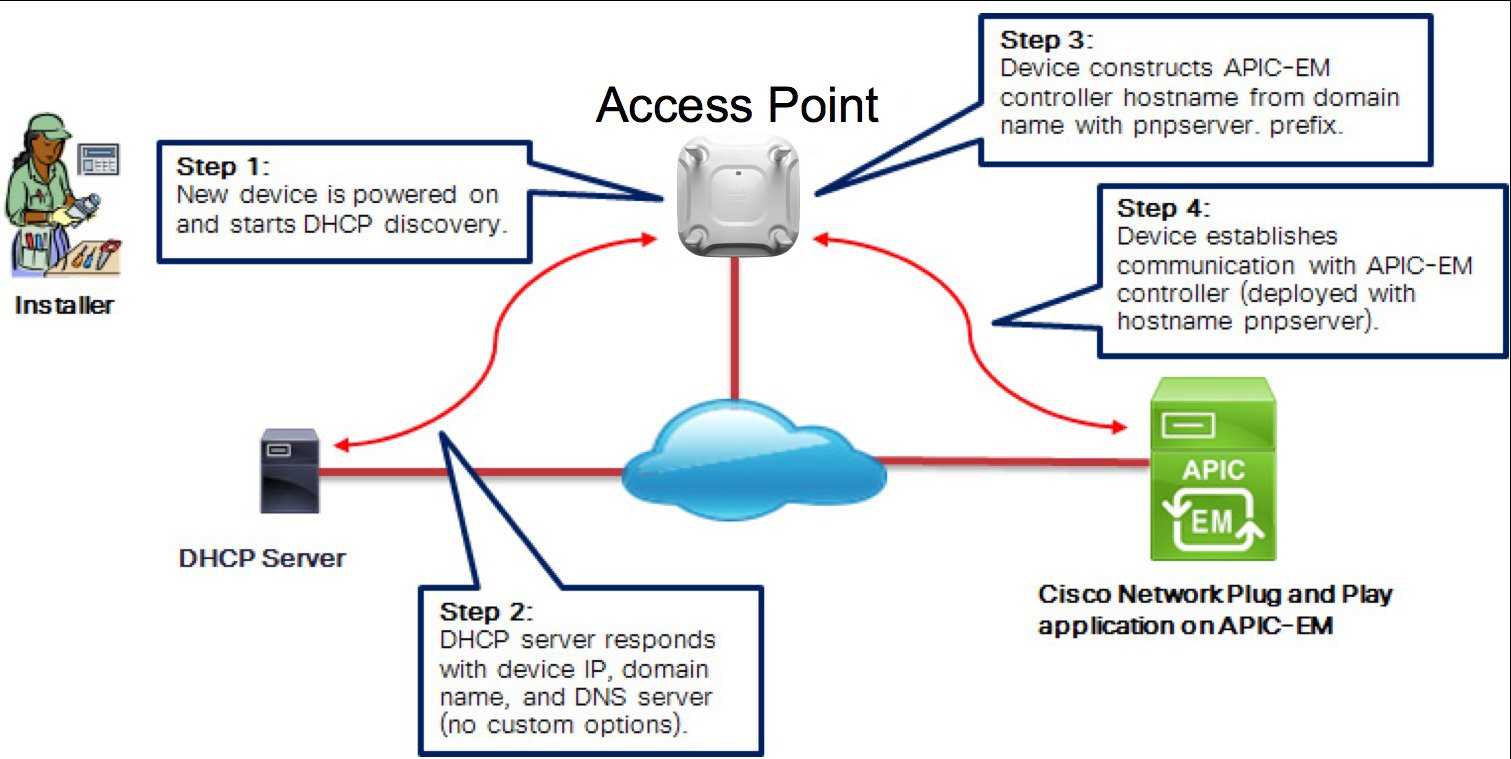
When you create small sites where pre-provisioning is not required, access points can be deployed without prior set up on the Cisco Network Plug and Play application and then claimed. When an installer installs and powers up the access point, it auto-discovers the Cisco APIC-EM controller by using the DHCP, DNS or cloud redirection service. After the auto-discovery process is complete, the AP either joins a WLC with configuration from local PnP server, or communicates with the cloud redirection service for direction to target WLC or PnP server.
| Virtual Machine Options | VMware ESXi Version | 5.1/5.5 |
| Server Image Format | ISO | |
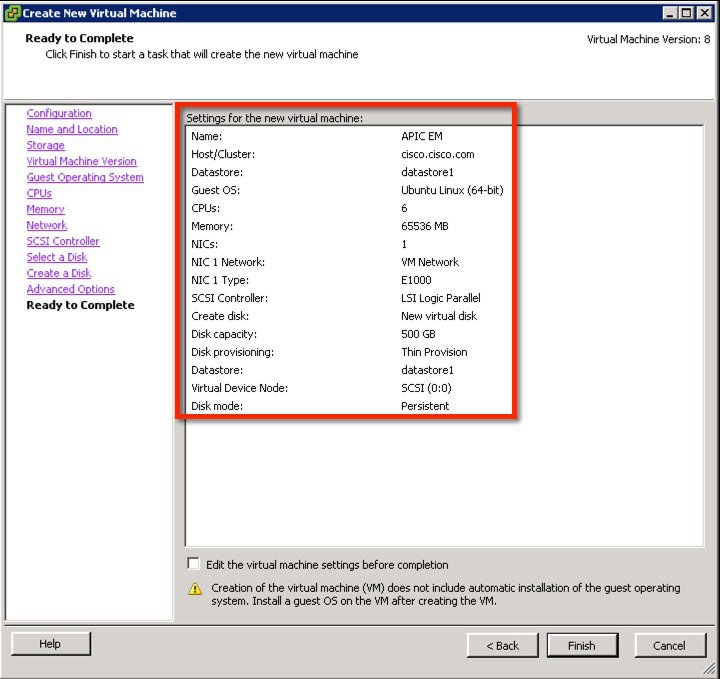
| Hardware Specifications | Virtual CPU (vCPU) | 6 |
| CPU (speed) | 2.4 GHz | |
| Memory | 64 GB |
| Note | For a multi-host deployment (2 or 3 hosts) only 32 GB of RAM is required for each host |
| Note | A single network adapter or network interface controller (NIC) is the minimum requirement. For security, we recommend that you use and configure two NICs on the server. See Security in the Limitations and Restrictions section of these release notes for additional information. |
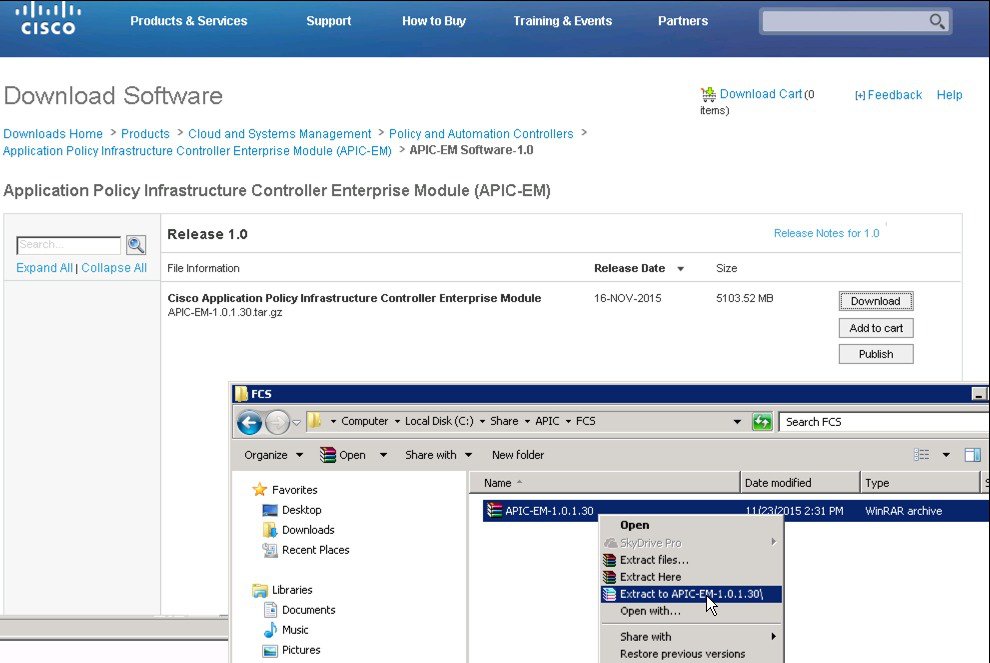
Upload the ISO to the ESXi 5.x server.
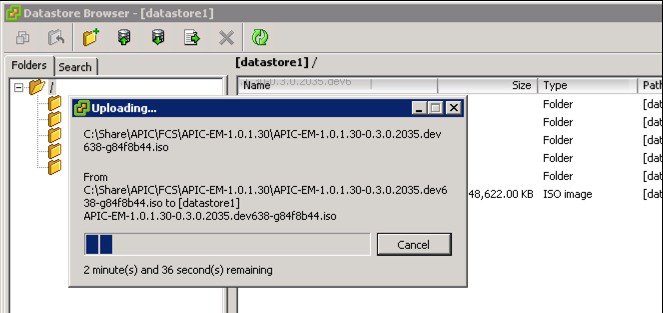
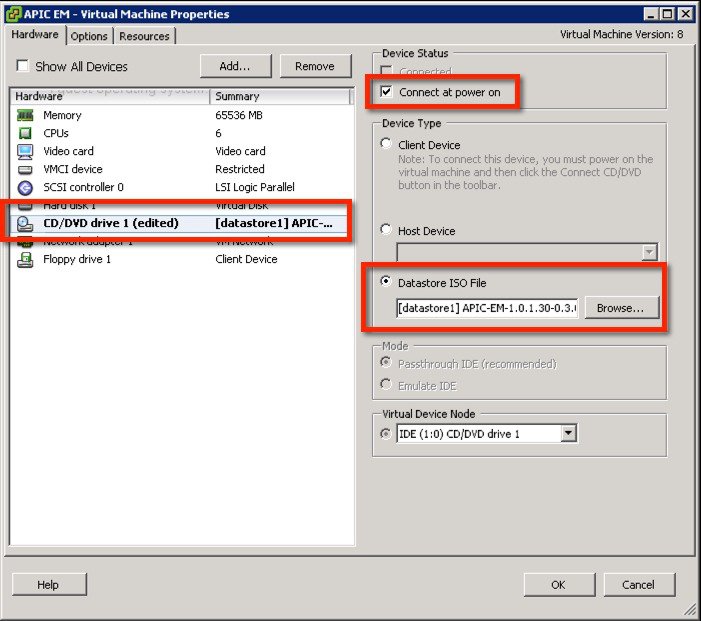
Mount the ISO in the CD/DVD then power up the VM.
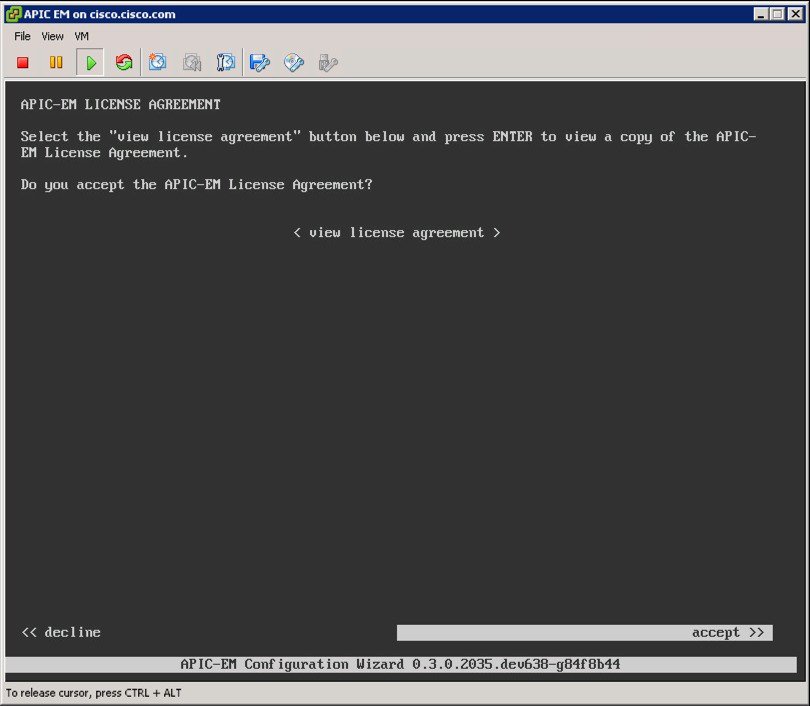
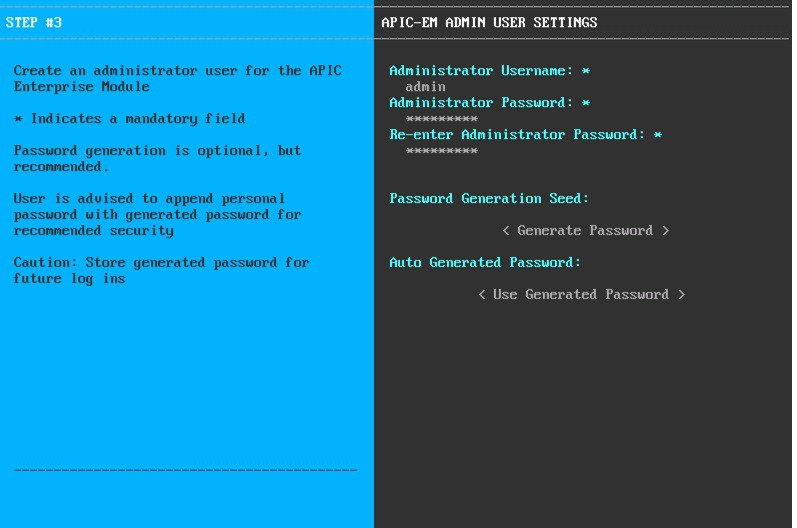
Allow the installation to complete, the VM will reboot as required. Once completed, the APIC-EM License Agreement will prompt to accept and continue (use keyboard to input and navigate).
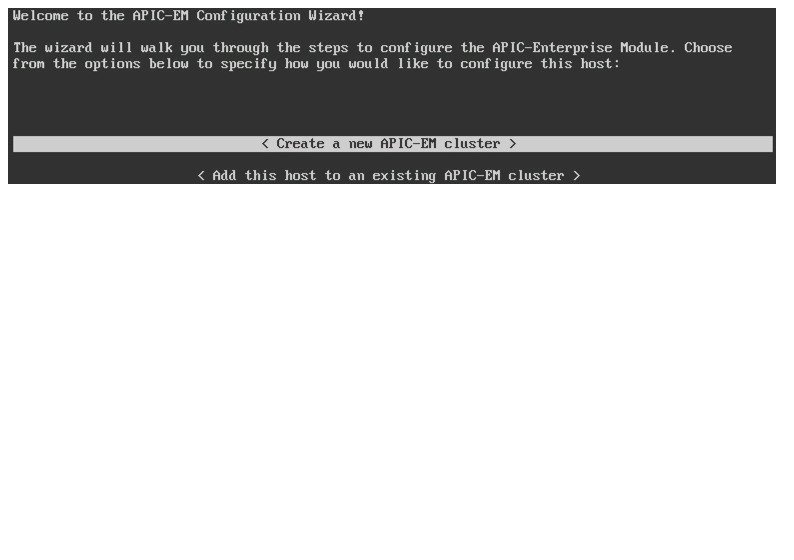
Select 'Create a new APIC-EM cluster'.
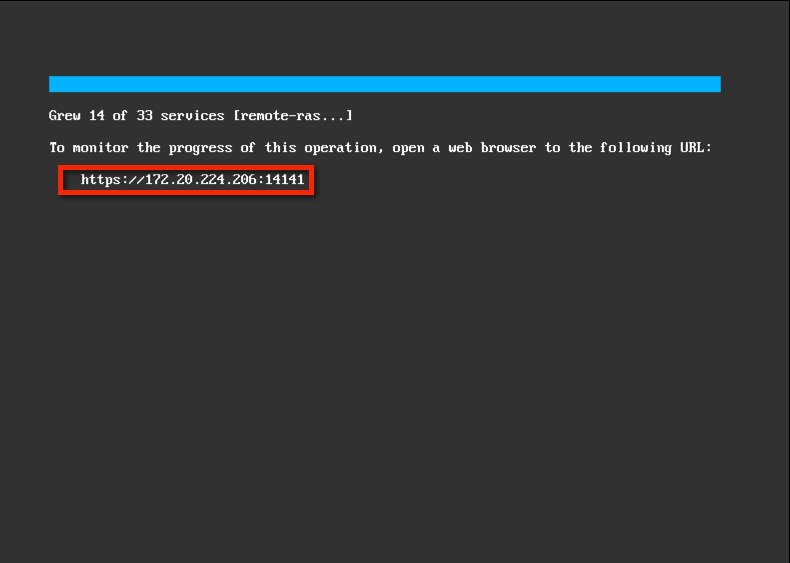
APIC-EM will proceed with installation, which will take some time (15-30 minutes). It provides an URL to monitor the progress at this link - HTTPS://MGT-IP-ADDRESS:14141 (note port 14141)
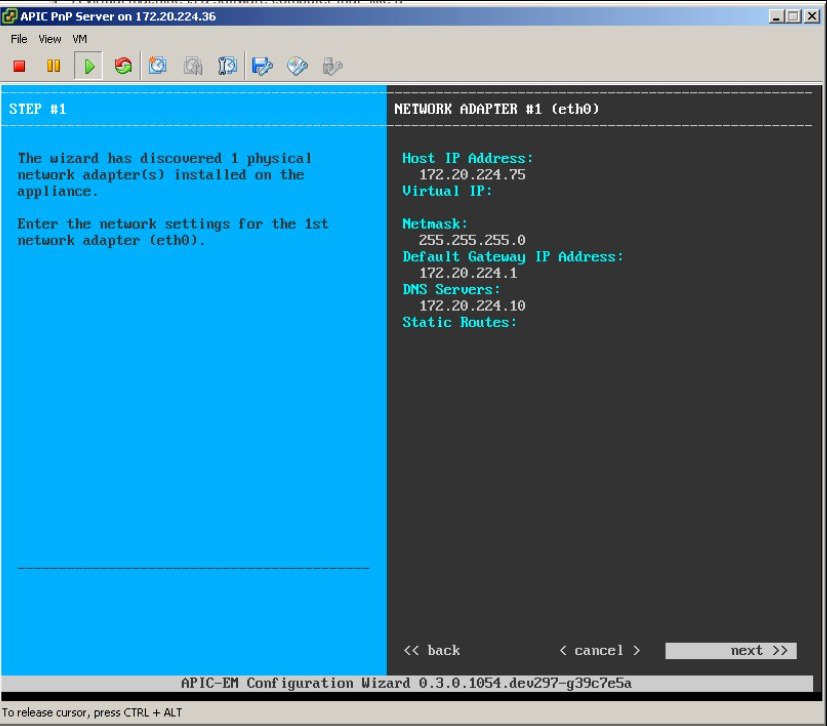
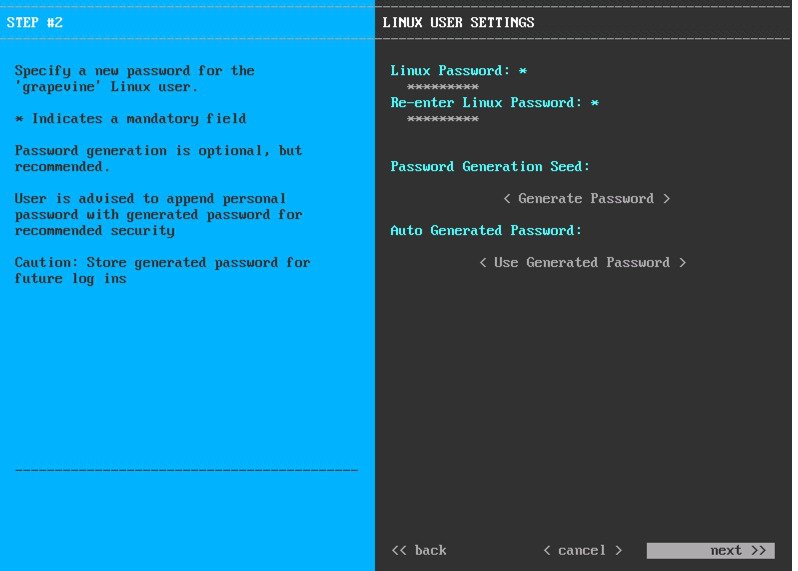
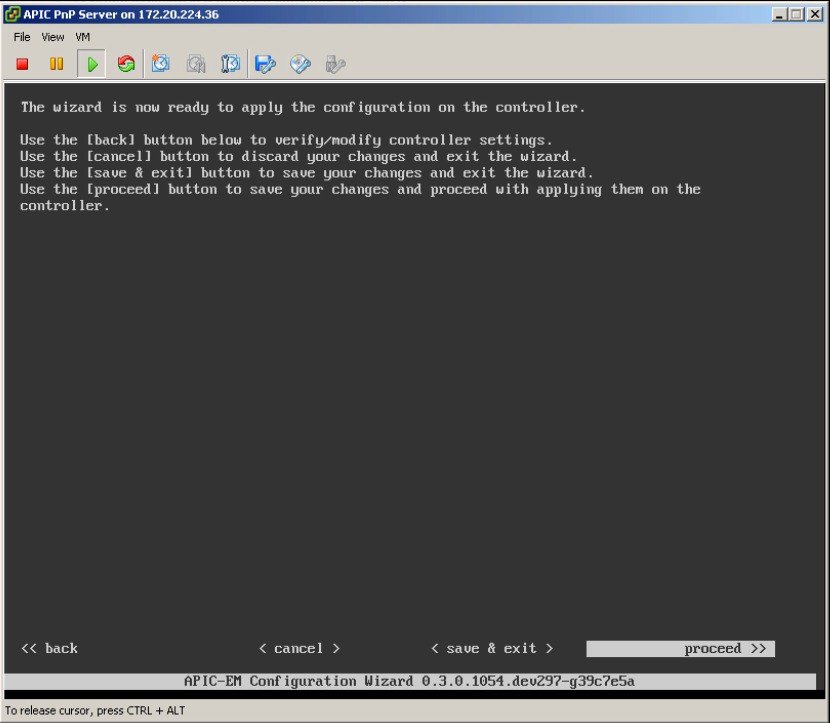
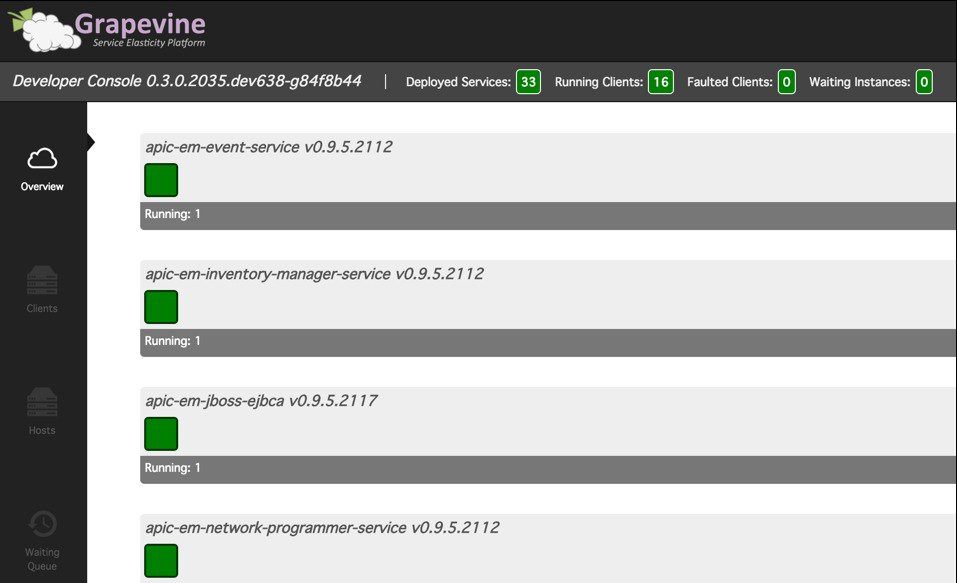
The console provides the configuration wizard status.
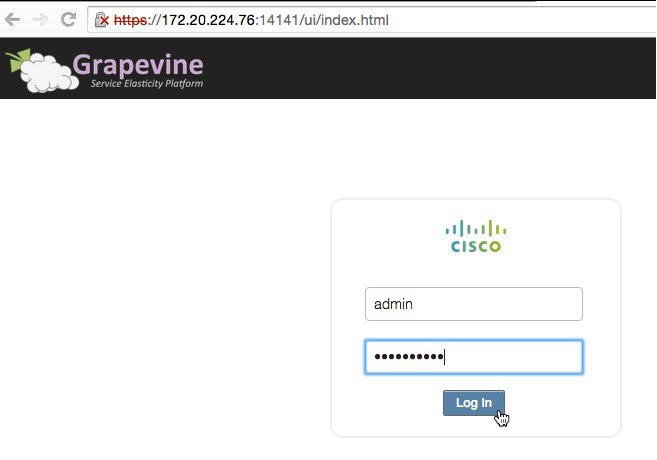
The previous link allows to monitor services being installed/started. Log in using the admin credentials provided in the installation step 3.
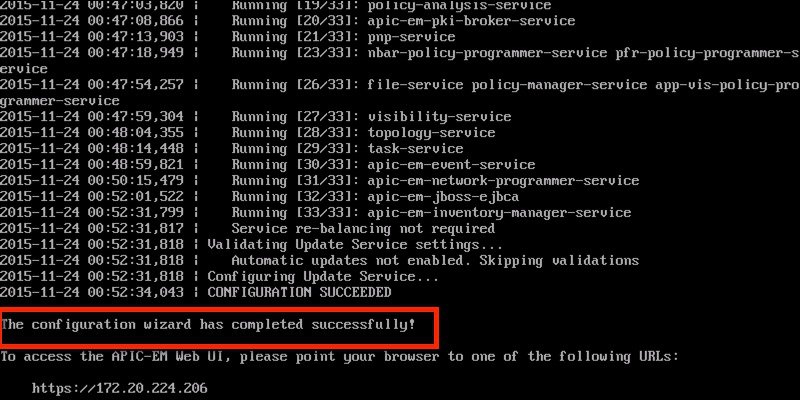
In the console dashboard, when deployed services and running clients are all showing green, it is then ready to be used for testing.
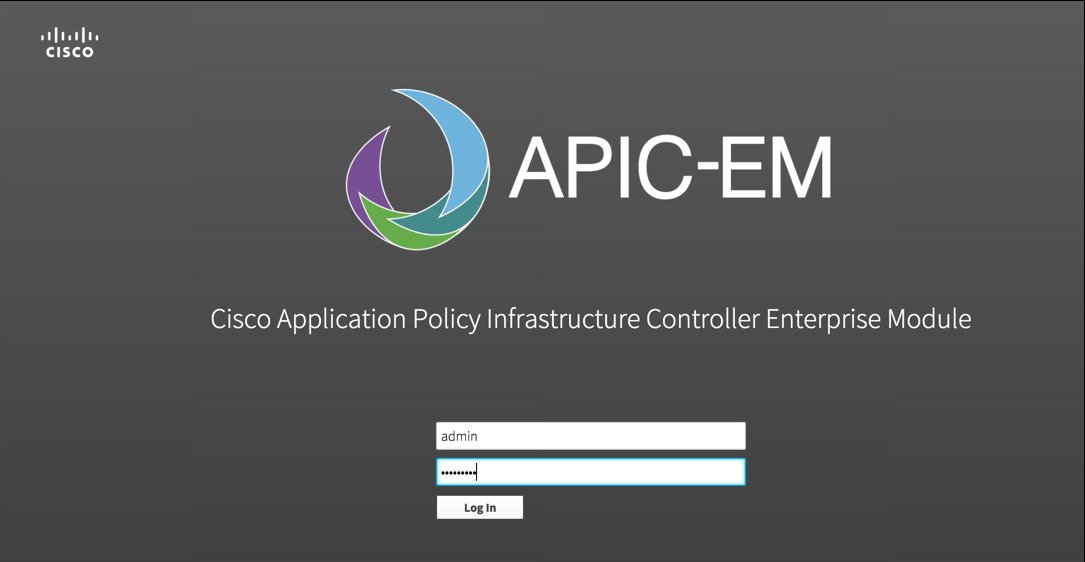
When configuration is successful, log in to the management application, link HTTPS://MGT-IP-ADDRESS (no additional port added). Use the same admin credentials created in step 3.
| Name of DHCP pool | ip dhcp pool pnp_device_pool |
| Range of IP addresses assigned to clients | network 192.168.1.0 255.255.255.0 |
| Gateway address | default-router 192.168.1.1 |
| option 43 ascii "5A1N;B2;K4;I192.168.1.123;J80" | ** |
** Option 43 string, copy/paste include quotes, insert your APIC management IP address here.
Cisco CAPWAP access points with software release 8.3 provides the necessary recovery image to support PnP. An example output from the console of a NEW AP during boot up will show the following:
*Mar 1 00:00:13.027: %LWAPP-3-CLIENTERRORLOG: Load nvram:/lwapp_ap.cfg config failed,trying backup. *Mar 1 00:00:13.027: %LWAPP-3-CLIENTERRORLOG: Load nvram:/lwapp_ap.cfg.bak config failed. *Mar 1 00:00:15.035: %LINK-6-UPDOWN: Interface GigabitEthernet0, changed state to up *Mar 1 00:00:15.107: %SYS-5-RESTART: System restarted -- Cisco IOS Software, C3700 Software (AP3G2-RCVK9W8-M), Experimental Version 15.3(20150923:181842)[pkpanda 173] Copyright (c) 1986-2015 by Cisco Systems, Inc. Compiled Wed 23-Sep-15 11:21 by pkpanda *Mar 1 00:00:15.107: %SNMP-5-COLDSTART: SNMP agent on host APfc5b.395a.b56c is undergoing a cold start *Mar 1 00:00:15.191: %LWAPP-3-CLIENTERRORLOG: NumOfSlots Mismatch Reinit all Radios config rcb:0 Cfg:2 *Mar 1 00:00:15.359: %SSH-5-ENABLED: SSH 2.0 has been enabledlwapp_crypto_init: MIC Present and Parsed Successfully
*Mar 1 00:00:16.151: %LINEPROTO-5-UPDOWN: Line protocol on Interface BVI1, changed state to up *Mar 1 00:00:20.003: DPAA Initialization Complete *Mar 1 00:00:20.003: %SYS-3-HARIKARI: Process DPAA INIT top-level routine exited *Mar 1 00:00:21.003: %LINEPROTO-5-UPDOWN: Line protocol on Interface GigabitEthernet0, changed state to up *Mar 1 00:00:23.003: %LINK-6-UPDOWN: Interface BVI1, changed state to down *Mar 1 00:00:24.003: %LINEPROTO-5-UPDOWN: Line protocol on Interface BVI1, changed state to down *Mar 1 00:00:27.151: %LINK-6-UPDOWN: Interface BVI1, changed state to up *Mar 1 00:00:28.151: %LINEPROTO-5-UPDOWN: Line protocol on Interface BVI1, changed state to up *Mar 1 00:00:28.223: %PNPA-DHCP Op-43 Msg: Process state = READY *Mar 1 00:00:28.223: %PNPA-DHCP Op-43 Msg: OK to process message *Mar 1 00:00:28.223: XML-UPDOWN: PNPA_DHCP_OP43 XML Interface(102) UP. PID=47 *Mar 1 00:00:28.223: %PNPA-DHCP Op-43 Msg: _pdoon.1.ntf.don=47 *Mar 1 00:00:28.223: %DHCP-6-ADDRESS_ASSIGN: Interface BVI1 assigned DHCP address 10.10.50.248, mask 255.255.255.0, hostname APfc5b.395a.b56c
*Mar 1 00:00:28.223: %PNPA-DHCP Op-43 Msg: _pdoop.1.org=[A1D;B2;K4;I192.168.1.123;J80;] *Mar 1 00:00:28.223: %PNPA-DHCP Op-43 Msg: _pdgfa.1.inp=[B2;K4;I192.168.1.123;J80;] *Mar 1 00:00:28.223: %PNPA-DHCP Op-43 Msg: _pdgfa.1.B2.s12=[ ipv4 ] *Mar 1 00:00:28.223: %PNPA-DHCP Op-43 Msg: _pdgfa.1.K4.htp=[ transport http ] *Mar 1 00:00:28.223: %PNPA-DHCP Op-43 Msg: _pdgfa.1.Ix.srv.ip.rm=[ 192.168.1.123 ] *Mar 1 00:00:28.223: %PNPA-DHCP Op-43 Msg: _pdgfa.1.Jx.srv.rt.rm=[ port 80 ] *Mar 1 00:00:28.223: %PNPA-DHCP Op-43 Msg: _pdoop.1.ztp=[pnp-zero-touch] host=[] ipad=[192.168.1.123]port=80 *Mar 1 00:00:28.223: %PNPA-DHCP Op-43 Msg: _pors.done=1 *Mar 1 00:00:28.223: %PNPA-DHCP Op-43 Msg: _pdokp.1.kil=[PNPA_DHCP_OP43] pid=47 idn=[BVI1] *Mar 1 00:00:28.223: XML-UPDOWN: BVI1 XML Interface(102) SHUTDOWN(101). PID=47 *Mar 1 00:00:29.155: %PNPA-DHCP Op-43 Msg: _pdoon.2.ina=[BVI1] *Mar 1 00:00:29.155: %PNPA-DHCP Op-43 Msg: _papdo.2.cot=[5A1D;B2;K4;I192.168.1.123;J80;] lot= [5A1D;B2;K4;I192.168.1.123;J80;] *Mar 1 00:00:29.155: %PNPA-DHCP Op-43 Msg: Process state = READY *Mar 1 00:00:29.155: %PNPA-DHCP Op-43 Msg: OK to process message *Mar 1 00:00:29.155: XML-UPDOWN: PNPA_DHCP_OP43 XML Interface(102) UP. PID=34 *Mar 1 00:00:29.155: %PNPA-DHCP Op-43 Msg: _pdoon.2.ntf.don=34
*Mar 1 00:00:34.039: No Config Present. PNP required. This indicates PNP process will initiate since no configuration is present.
Example that AP config is present (PNP will not start):
*Mar 1 00:00:34.043: Config Present. PNP Not required.
To check if AP has configuration perform the following command on the AP console:
AP#show capwap client rcb AdminState : ADMIN_ENABLED SwVer : 8.2.4.4 NumFilledSlots : 2 Name : APfc5b.395a.b56c Location : default location MwarName : There is no WLC name MwarMacAddr : ff01.0000.0000 MwarHwVer : 0.0.0.0 There is no WLC IP Address ApMode : Local ApSubMode : Not Configured OperationState : DISCOVERY
Cisco Network Plug and Play allows you to pre-provision and plan for new sites. When you create a new site, Cisco Network Plug and Play enables you to pre-provision the access point(s) configuration file, product serial # and product ID for the selected platform. This simplifies and accelerates the time that it takes to get a site fully functional.
To pre-provision a site on your network, perform these steps:
ProcedureCreating a Site/Project